Tuesday, April 24, 2012

Fertilizing 101


Look at what has just arrived on our doorstep! Yes, that’s right, it’s every girl's dream…a box of organic fertilizers! Could this day BE any more exciting?? No it could not.

At least that was our initial reaction when this adorable miniature farmhouse of plant nutrients showed up at our apartment last weekend. Our enthusiasm lingered just long enough for us to rip open the package, remove the various colorful bottles,  and come to the unfortunate realization that we had absolutely NO idea what we were doing (in case you haven’t noticed, this seems to be a common theme). Here’s a glimpse of what we found inside:

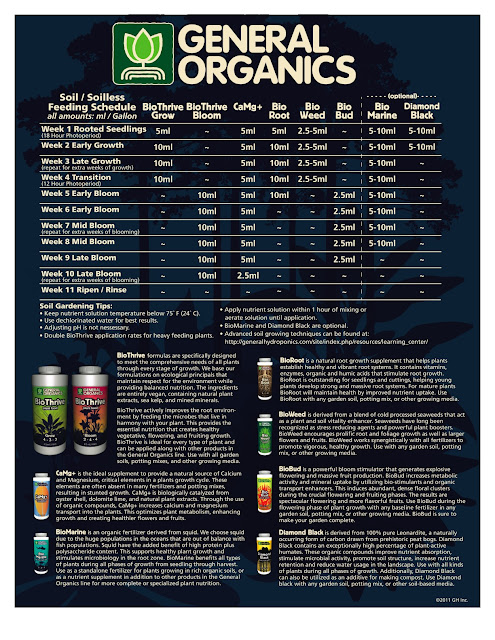
16 oz BioThrive Grow
16 oz BioThrive Bloom
8 oz CaMg+
8 oz BioRoot
8 oz BioWeed
8 oz BioMud
8 oz BioMarine
8 oz Diamond Black

Umm…..what? Should we be totally ashamed to admit we were expecting one giant bottle that said something along the lines of “Organic Plant Fertilizer- use daily” ?? Apparently this was going to take even more research than we originally predicted.

Thankfully, the General Organics website appears to have been designed specifically with ignoramuses like us in mind. “Growing vegetables? In soil? Great! Follow this schedule without knowing a THING about plants and your veggies will grow big and strong and beautiful!”

Okay- seems simple enough, BUT, being the gigantic science nerd that I am I clearly wanted to know more about what was going on here. After all, I do have a Master’s degree in nutrition. I could explain to you the path of Vitamin A in the human body without a second thought, but I literally could not describe how photosynthesis works without a deep investigation into the pages of Wikipedia. I happen to find this rather embarrassing.

As it turns out, there are tons of resources through the USDA, state and local departments of agriculture, and local cooperative extensions that are just dying to teach us city-dwellers a thing or two about plants and how to grow them. This particular info on plant nutrition was mostly taken from the North Carolina Department of Agriculture and Consumer Services’ website. The segment was actually entitled “KidsWorld: Plant Nutrition,” but hey, who am I to discriminate? Here’s a summary of the basics so you can sound super smart and informed the next time you happen to be hanging out with a hot group of organic farmers or botanists (you never know?):

Plants need 3 non-mineral nutrients and 13 mineral nutrients to survive. Non-mineral nutrients come from air and water: hydrogen, oxygen, carbon. In photosynthesis, plants use energy from the sun to convert these into starches and sugar for food! Hooray!


The 13 mineral nutrients come from the soil. Soil doesn’t always have enough of these nutrients for plants to thrive, which is why we need these crazy organic fertilizers. The mineral nutrients are divided into macronutrients and micronutrients.

Primary macronutrients: nitrogen, phosphorus, potassium – plants need tons of these so they usually need to be added to the soil and are the main components of fertilizers. Our organic fertilizers source these from natural foods like seaweed and squid. Regular fertilizers add specific ratios of these nutrients, designated on the package in the form N-P-K (nitrogen, phosphorus, potassium). 

Secondary macronutrients: calcium, magnesium, sulfur – calcium and magnesium are usually added to the soil to make it more alkaline (more on this later), and sulfur comes from decomposing organic matter, like compost (more on this later, too).

Micronutrients: boron, copper, iron, chloride, manganese, molybdenum, zinc – again, compost is an excellent source of these minerals, but they can also be added into fertilizers.

There are lots of other factors that play into the nutrient composition of the soil, like texture, pH, temperature, etc…but this possibly exceeds the scope of Fertilizing 101... so you will have to stay tuned!

Saturday, April 21, 2012

Dirt Removal: Chapter 4


Plan D, once it became a plan, made us smack our heads over our stupidity for not thinking of it WAY earlier. All this time we had been trying to figure out how we'd get this dirt out ourselves, but duh, we would pay someone to take away the dirt for us! And, upon searching Craig's List we found that there was quite a market for "backyard rubbish removal." So the next day, I called one of the listings, negotiated a price of $150 and made an appointment for that evening.

I waited in anticipation. When I finally got a knock on our front door, I opened it to see two giant men and one giant truck. All good signs. I happily lead them to our backyard and presented the haphazardly thrown bags. One of the men immediately stepped forward, moved to lift a bag, failed to lift the bag, and concluded, in a heavy Polish accent, that the bags were "unliftable." I mean, I knew they were "unliftable" by someone like me, but I assumed that for these men, the bags would somehow be "liftable." I guess not. They instructed me to redistribute the dirt amongst more bags, so they were lighter. And then, they left. It took only 3 minutes for Plan D to completely crumble.

And now it's today. I'm sitting in our backyard, smiling at our garden and then cringing at those bags, which are growing heavier by the day, I'm sure of it. They stare back, mocking me as I strategize on Plan E.

"body" bags

Dirt Removal: Chapter 3

Fast forward from the joy of breaking ground and getting started on our garden in the beautiful sunshine, to five days later, at night, when I glanced outside and saw to my horror that those bags of dirt were still sitting there! My anxiety levels at an all new high, I decided to execute our plan of throwing the dirt over the fence and into the empty lot, all in pure darkness. I carried out our ladder to the backyard and found some weird little container in which to scoop the dirt. Then I attempted to make a dent in the enormous mound of dirt in one bag, trying not to look at the other 19 bulging bags, including the first few we had left in the alleyway. Just one step at a time, gotta stay positive, keep your chin up, these were my thoughts as I scooped up the dirt, climbed the ladder and threw it over. Of course, while I was doing all this, I completely forgot about the trees that are sitting in our yard and the adjacent yard because it was PITCH BLACK OUTSIDE, and so my dirt ricocheted off the branches of those sneaky trees and came flying back at me before landing right back into our backyard. After a few more throws with the exact same unsuccessful result, I gave up, and began constructing a plan D.

Dirt Removal: Chapter 2


After spreading our dirt throughout the backyard, we decided to throw the rest of the dirt into the Hefty garbage bags we had purchased. Again, no plan here. I guess we just assumed that those garbage bags would miraculously transport themselves from the backyard to the front with little to no effort on our part. But, as we filled a couple bags, only halfway might I mention, and realized, even half full, they were so heavy we could only move them by dragging them, we called for a time-out and had a proper discussion on the dirt removal process. It was at this point that we had our first semblance of a plan. Upon inspection, we saw that the fence on one side of our backyard, by our alleyway, has a door that opens to the next yard over, which is also connected to the street. So, we decided that we'd drag all the bags to the alleyway, and then hope that the people next door would at some point allow us to drag all these bags through their yard and into the street. Whereupon, the car that neither one of us owns, would be sitting there waiting for us, in a parking spot which is normally not available, so we could easily load up the bags and drive to the dump that may or may not exist in our neighborhood. Easy peasy. Both of us agreed on what a great idea this was and began to drag the bags toward the alleyway.


(Bags abandoned in alleyway)

An hour or so later, we came up with what we thought to be an even better plan. So the back side of our backyard faces an empty lot- it's one of those lots that is basically all dirt and weeds, with a few scattered bushes and what not. So we thought, why not throw the dirt over the fence and into the lot? Sounded good to us. Of course...we didn't want to get caught doing it, so we decided we'd do it at NIGHT. Yup, that was our plan- be super sketchy and throw dirt into the empty lot next to us in the darkness. So for the time being, we decided to drag all the bags toward the back fence instead of the alleyway. Our process was as follows: Fill a bag with dirt (takes about 1 minute), take turns straining with the weight of the bag and dragging it toward the back fence (takes about 5 minutes), repeat. Soon we had a nice little trail of bags leading to the back fence. Once we finished digging out the garden, we were too tired to deal with the bags of dirt. We decided to figure it out another day...

Dirt Removal: Chapter 1

One problem we did not foresee upon starting our garden was how difficult it would prove to be to get rid of the old dirt. When we initially planned all this, we barely batted an eye at the so called "challenge" of dirt removal, even when our landlord, who is built like The Hulk, expressed some serious concern. So our backyard is completely blocked in on all four sides with no access to the street? No problem! We'll "figure it out." Those words are now haunting me as I stare at 20 Hefty bags filled with dirt, too heavy to be lifted, and scattered throughout our backyard, looking more like body bags in a scene from Dexter, than bags of dirt because honestly, WHO HAS 20 BAGS OF DIRT LYING AROUND??

But, let me explain how we got to our current situation. When we first started digging, a week ago today, we decided to scatter the old dirt throughout the rest of the backyard. Not a bad idea, even in retrospect. We threw some dirt over here, threw some dirt over there, no problem. We were previously warned that if we did this, we had to make sure the dirt levels weren't higher than the patio level, as a rain storm would cause a serious overflow of dirt and lead to a mud pit. So while Alyssa uprooted the shrubs, I handled the dirt dispersal. At first I just shoveled the dirt and chucked it into some nearby areas, barely having to move at all. But fairly quickly, in order to ensure that I didn't cause a "dirt overflow," I needed to travel a few steps from the garden pit so I could throw the dirt onto a new spot. And very soon after that, I seemed to have exhausted all easy to access spots and so, while tromping around, spinning this way and that in search of sparser areas, all the while holding my extended shovel, causing Alyssa to shrink back in fear, I happened to knock off the ears of every single porcelain garden rabbit that had been placed in the backyard by the previous tenant. Oops. All in all, our first attempt at dirt removal was relatively successful. Aside from the rabbit casualties, I was able to spread a good amount of the dirt throughout our yard and not cause any type of overflow. Of course, much to our chagrin, I had barely made a dent in the volume of dirt we still had to remove.

Tuesday, April 17, 2012

How to grow tomatoes- Part 1


We were told that tomato seeds are the only ones, of the ones we purchased, that we cannot plant directly into the ground of our garden as they are too fragile. Instead, we need to germinate them indoors (yea I said germinate, check ME out) until they become sturdy little sprouts, and only then can we transplant them to the outdoors. So, these were our steps for growing tomatoes:

  1. Start with a series of small containers that can be functioned into a seed starter tray. You don't have to buy anything fancy (we ended up buying a proper seed starter tray but only because we happened to be at Home Depot and there was one staring us in the face). Dixie cups or egg cartons work just as well. Just make sure they are somewhat porous to allow for drainage, or you can poke a few small holes at the bottom.
  2. Fill each container about 3/4 of the way full with seed starer soil.
  3. Create 1/4" deep little indents into the soil.
  4. Drop 1-3 seeds into the indent and GENTLY cover with soil. (I had trouble with the "gently cover" part which is why I'm emphasizing it here).
  5. If you're growing more than one type of tomato (we are- Heirloom and Cherry) this is a good time to notate somewhere which container is growing what.
  6. Water! The soil should stay moist, but not sopping. We had to water twice a day in order to keep the soil moist. A spray bottle of water is the best tool for this so you don't accidentally dump a ton of water on your delicate little seeds.
  7. Keep the containers somewhere warm, about 75 F (above the refrigerator is actually a great spot).
  8. It should take a week or so for them to sprout. Once you see little sprouts, move them to a place where they can get LOTS of sunlight. And don't forget to water!!

Monday, April 16, 2012

Let the digging begin

We broke ground on a beautiful, sunny Saturday afternoon. Our landlord had allowed us to use the random assortment of spades and hoes that he has in the basement. So we armed ourselves with our tools, along with a fancy pair of shears we had purchased the day before, and began hacking away at the shrubs and plants while clearing away the dirt . One change to the initial plan- instead of creating two separate 4'x6' sections, we decided it would be easier to just make these two sections into one giant section. We mostly decided this because the other section in which we had planned the garden has an enormous shrub in it with thick branches that our shears would not have been able to handle so well. Plus, it ended up begin easier to remove all the dirt and add the new soil into one giant section, versus doing it in two sections. So, after several hours, we were able to haul away all the old dirt and plants, bushes and weeds. By "haul away" I really mean, we threw all of this stuff into a bunch of heavy duty garbage bags which are now sporadically lying across our backyard, as these bags, once filled with dirt, proved to be unbelievably heavy and difficult to maneuver. We're still trying to figure out what to do with said bags...more to come on that. But for now, back to the garden!

  1. We dug into the ground about 6-8" deep.
  2. Next we leveled off the ground with our hoes.
  3. We laid the landscape fabric over the dirt.
  4. We dumped our rocks evenly throughout the pit and over the landscape fabric.
  5. Finally we emptied a combination of potting soil and compost over the rocks and spread it around. Our calculations of how much soil we needed were a bit off, we never claimed to be math experts here, because we have a few extra bags, but we figured the dirt may settle a bit and we'll need this extra dirt at that point. We'll see.
  6. Voila! A beautiful raised-bed garden ready to go!


Tuesday, April 10, 2012

Soil has arrived!

And so it begins... After several failed attempts at delivery, due to the garden store owner’s extreme flakiness, which consisted of a no-show on the first delivery date, a miscommunication on the second delivery date, and a 2 hour delay on the third delivery date, our soil arrived! We stood aside as the soil was carried through the apartment (our attempts to help were almost laughed at- 40 pound bags of soil are not as easy to carry as you might imagine) and watched in anticipation as the bags piled up in the backyard. Meanwhile, our landlord, who had happened to stop by that day, stood in the doorway, at first shaking his head and laughing at our garden aspirations, but then quickly becoming more and more horrified as the number of soil bags continued to arrive. We tried to placate him by painting a picture of a quaint little garden with luscious, ripe veggies poking through the greenery, but his stress levels continued to rise as he pictured, not a quaint veggie garden, but rather a massive construction zone.

Next steps:

  1. Buy some gardening gloves and gardening shears- there are some aggressive looking shrubs in our current garden that need to be uprooted.
  2. Buy some giant, heavy-duty bags to put all the old dirt in. Eventually we’ll have to cart all this old dirt to some sort of dump.
  3. Recruit more gardeners to help dig! Our next-door neighbors expressed some interest...
  4. Start digging!!!